To be able to collect spatial data (photos with exact coordinates), we need to start a project in QGIS.
Usually, we need some data in our background ie. layer (to be able to determine ourselves in space, i.e. locate). For background data, we will use Open Street Map, and for GIS format it would be best to save it as Geopackage. Shapefile is not able to record raster data with attributive data, its capacity is up to 2gb, it is also in multi format with a minimum of 3 files (shp, shx, dbf). Well, if we share the data with someone, it is much easier to work in geopackage format.
We start by opening QGIS on the computer, on the left side you have the Browser panel, open XYZ Tiles there, you can double-click on OpenStreetMap or drag the mouse to the workspace. To add the Open Street Map plugin, you need to type in Google https://wiki.openstreetmap.org/wiki/Tile_servers, copy the link with the tile, as in the picture. Then in the browser, click on XYZ, right click on New Connection and copy the link (be sure to delete the $ symbol). Name the name of the plugin and confirm the data with OK.
The next plugin we need is the OSM downloader.
With osm plugin we download our data. If it does not appear in the browser, go to settings and select Show also experimental plugins. Click on the Download osm data by rectangle selection icon, it selects the area.
After selection, a new window appears, where save file is selected. There we type in osm format and in the desired folder. After the file is downloaded, launch it by dragging it from the browser to the desktop.
Now we still need to set up the CRS. Click on the EPSG icon in the lower right corner, type in the filter 31276 Balkans Zone 6, confirm with OK.

After that, we can add more topics such as Google Sattelit or Hybrid, for better navigation in the field. On the left side of the Browser panel, click on Manage Map Themes, then Add
Themes and save as OSM theme.
To create a spatial layer in QGIS, in the main menu select Layer, New Geopackage Layer. When a new window opens, click on the three dots in Database, select the desired folder and save the file in gpkg format.
Enter the name of the layer in the name field.
For Geometry type, choose this time Point.
For Coordinate Reference System (CRS), click on the icon on the right and type in the filter 31276, then select Balkans Zone 31276. Confirm with OK.
Now we can proceed to form column names for the table under the New Field section.
For our needs we will form Date and Photo.
In the Name field, type Date.
In the Type field, select Date, then click Add to field list.
Repeat the same process with the photo, but for the photo, select Text in the Type field. Confirm with OK to form one layer in Qgis.
Layer styling and shape formation

The standard style in the created layer has not been reviewed enough, so it is necessary to change the parameters. Right-click on the created layer and select Properties. In the new window that appears, on the left panel, select Symbology. There you can adjust the symbols, colors, size and other things yourself. Later, we would return to symbology if categorization is being done to classify data by type of attributive data or date, e.g. to see by type of pillar, date, layered and by color, when and what was done, so you can more easily plan further operations.
We move again to the left to the panel and select Attribute forms.
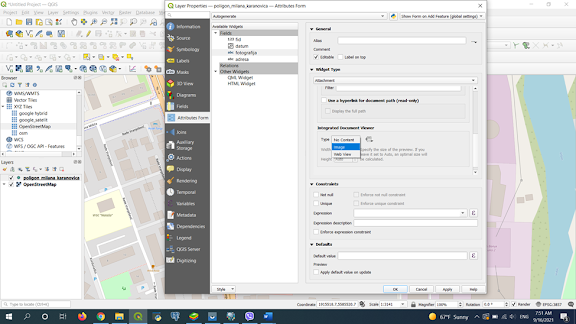
We leave the basic date column to fill in automatically, we can mark not null, for mandatory filling. For the photo, we need to change the Widget Type and select Attachment.
Select the Relative paths option. This option is important to us because of painting and marking points, i.e. data accuracy.
To view the image in Qgis, scroll down to the Integrated document viewer and click on Type, select Image.
Record the project.
Data transfer to a mobile device.

Data transfer is done via the Mergin plugin, a data storage and transfer service.
In QGIS, in the menu select Plugins, Manage and Install Plugins. A new window will appear.
On the left panel, select all, then type Mergin. Select the plugin and click on install plugin. QGIS needs to be restarted.
After installation, you will see the Mergin icon in the Browser panel. Right-click on the Mergin icon and select Configure. Enter your username and password and confirm. You will see a list of folders under the Mergin icon.
To start uploading data, right click on Mergin and select Create New project. When a new window appears, type the desired name, e.g. Columns overview, second layer, slats overview. For easy recognition.
The project is ready to be downloaded to a mobile device.
Data collection using the Input application.
The project can now be accessed through the Input application. To access the Mergin service, select My project in the lower left corner written in white letters. Enter the Mergin username and password and click Sign in.
A synchronized project that needs to be downloaded will appear, select the icon on the side.
After downloading, select Home and the project will be visible.
When the project is selected, the background will be opened, to record the data select Record and then we can move the marker on the background.
In my experience, the marker can define the exact location in addition to the GPS location. In the event that the marked coordinate does not appear, it should be checked on another subject that has been recorded. I noticed during testing, it is recorded on the OSM theme, and the coordinate is recorded on Google Sattelit. When the location is selected, Add point is selected and a new window will appear in which data can be entered and the object photographed. I did the testing in Vrbaski put street, next to Elektrodistribucija Banja Luka.


No comments:
Post a Comment